



How to Install a Mobile Hydraulic Oil Cooler: Step-by-Step Instructions
Release Time:
Nov 26,2025
How to Install a Mobile Hydraulic Oil Cooler: Step-by-Step Instructions Table of Contents 1. Introduction to Mobile Hydraulic Oil Coolers 2. Importance of Proper Installation 3. Essential Components of a Mobile Hydraulic Oil Cooler 4. Preparation Before Installation 5. Step-by-Step Installation Guide 5.1 Step 1: Gather Necessary Tools and Materials
How to Install a Mobile Hydraulic Oil Cooler: Step-by-Step Instructions
Table of Contents
- 1. Introduction to Mobile Hydraulic Oil Coolers
- 2. Importance of Proper Installation
- 3. Essential Components of a Mobile Hydraulic Oil Cooler
- 4. Preparation Before Installation
- 5. Step-by-Step Installation Guide
- 5.1 Step 1: Gather Necessary Tools and Materials
- 5.2 Step 2: Mounting the Cooler
- 5.3 Step 3: Connecting Hydraulic Lines
- 5.4 Step 4: Electrical Connections
- 5.5 Step 5: Testing the System
- 6. Maintenance Tips for Your Mobile Hydraulic Oil Cooler
- 7. Common Troubleshooting Tips
- 8. Frequently Asked Questions
- 9. Conclusion
1. Introduction to Mobile Hydraulic Oil Coolers
Mobile hydraulic oil coolers are essential components in various industries, including construction, agriculture, and manufacturing. These systems play a critical role in maintaining the optimal temperature of hydraulic fluids, thus ensuring the efficiency and longevity of hydraulic equipment. Understanding how to properly install a mobile hydraulic oil cooler is vital for both performance and safety.
2. Importance of Proper Installation
The installation process of a mobile hydraulic oil cooler significantly impacts its functionality. **Improper installation** can lead to overheating, reduced efficiency, and even equipment failure. By following correct procedures, operators can ensure their systems remain reliable and effective for an extended period.
3. Essential Components of a Mobile Hydraulic Oil Cooler
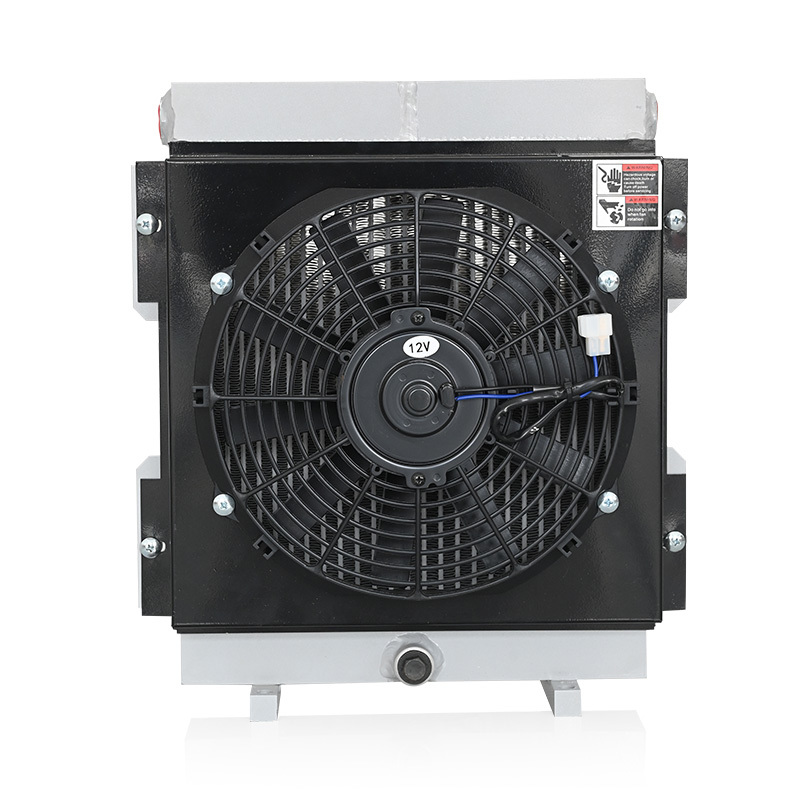
Before diving into the installation process, it is essential to understand the critical components involved in a mobile hydraulic oil cooler:
- Heat Exchanger: Responsible for dissipating heat from the hydraulic fluid.
- Fan: Uses airflow to enhance heat transfer efficiency.
- Mounting Bracket: Provides a stable installation point for the cooler.
- Hydraulic Lines: Connect the cooler to the hydraulic system.
- Electrical Connections: Required for fan operation and other components.
4. Preparation Before Installation
Preparation is key to a successful installation. Follow these steps:
- **Read the manufacturer's manual:** Familiarize yourself with specific instructions and recommendations.
- **Gather tools and materials:** Ensure you have all necessary tools, such as wrenches, screwdrivers, and hydraulic fittings.
- **Check the workspace:** Ensure that your installation area is clean and spacious.
5. Step-by-Step Installation Guide
5.1 Step 1: Gather Necessary Tools and Materials
To begin, you will need the following tools and materials:
- Hydraulic oil cooler kit
- Mounting hardware
- Hydraulic hoses
- Wrenches and sockets
- Electrical connectors
- Safety glasses and gloves
5.2 Step 2: Mounting the Cooler
Begin by securely mounting the cooler in a location that allows for adequate airflow. Follow these steps:
- Position the cooler in the preferred location, typically near the hydraulic reservoir.
- Use the mounting brackets to secure the cooler to a frame or platform.
- Ensure the cooler is level and stable to prevent vibrations during operation.
5.3 Step 3: Connecting Hydraulic Lines
The next step involves connecting hydraulic lines to the cooler. This is crucial for ensuring proper fluid flow:
- Identify the inlet and outlet ports on the cooler.
- Use the appropriate hydraulic hoses to connect the cooler to the hydraulic system.
- Ensure all connections are tight and leak-free. Use thread sealant if necessary.
5.4 Step 4: Electrical Connections
Once the hydraulic lines are secured, proceed to the electrical connections:
- Connect the fan's power supply to the appropriate electrical source.
- Ensure all electrical connections are secure and insulated.
- Check that the wiring is organized to prevent interference with moving parts.
5.5 Step 5: Testing the System
Before concluding the installation, testing is crucial:
- Start the hydraulic system and allow it to reach operating temperature.
- Check for leaks around hydraulic connections.
- Ensure the fan operates correctly and that airflow is unobstructed.
6. Maintenance Tips for Your Mobile Hydraulic Oil Cooler
To maximize the lifespan and efficiency of your cooler, regular maintenance is essential. Consider the following tips:
- **Inspect regularly:** Check for leaks, corrosion, and any signs of wear.
- **Clean the cooler:** Remove debris and dirt from the cooler fins and fan.
- **Change the hydraulic fluid:** Follow manufacturer recommendations for fluid replacement.
7. Common Troubleshooting Tips
If you encounter issues with your mobile hydraulic oil cooler, consider these troubleshooting tips:
- **Overheating:** Check for blockages in the air intake and ensure the fan is functioning properly.
- **Fluid leaks:** Inspect all connections and hoses for wear or damage.
- **Poor cooling performance:** Verify that the cooler is not obstructed and that the hydraulic fluid is circulating properly.
8. Frequently Asked Questions
What is a mobile hydraulic oil cooler?
A mobile hydraulic oil cooler is a device designed to maintain the temperature of hydraulic fluids, preventing overheating and ensuring efficient operation of hydraulic systems.
Why is proper installation important?
Proper installation is crucial to ensure efficient cooling, prevent leaks, and extend the lifespan of hydraulic components.
How often should I perform maintenance on my cooler?
Regular inspections should be conducted every few months, while fluid changes should follow the manufacturer's recommendations.
Can I install a hydraulic oil cooler myself?
Yes, with the right tools and knowledge, you can install a hydraulic oil cooler yourself, but ensure you follow the manufacturer's guidelines closely.
What are the signs that my hydraulic oil cooler needs replacement?
Signs that your cooler may need replacement include persistent overheating, physical damage, or significant leaks.
9. Conclusion
Installing a mobile hydraulic oil cooler is a vital process that ensures the efficiency and longevity of hydraulic systems. By following the step-by-step instructions outlined in this article, you will be equipped to perform the installation competently. Remember to conduct regular maintenance and troubleshooting to maintain optimal performance. With the right approach and attention to detail, you can ensure your hydraulic equipment runs smoothly and reliably for years.
Keywords:
You Can Also Learn More About Industry Trends


Specializing In The Research And Development And Sales Of Hydraulic Products


Contact Us
Phone/Whatsapp
+8613933722213 / +8613933744887
Address
No. 158, Xiaotun Automobile and Motorcycle Industrial Zone, Qinghe County, Hebei Province